It’s finally Friday and I wanted to end Pinterest Week with a fun Christmas project I did last fall in preparation for my favorite holiday. Behold, the monogrammed, glitter Christmas ornaments. Oh, I still love these so much. They make my heart happy. I made these ornaments because we needed to bring an ornament as a gift to a rehearsal dinner for a December wedding. I decided I wanted to make the ornament myself. I then decided that all of our friends and family should get one!

Warning: I’ve failed just a bit in the “Pinterest” part of this post. Because while I did find the tutorial on Pinterest…I didn’t PIN the project! Because I’m just paranoid enough to think,
“If I pin this, some of my friends, whom I am making these gifts for, may see the pin. And if they see it, they will either A. immediately know I intend to make these for them, therefore ruining the surprise or B. they will see this brilliant idea and immediately try it for themselves, therefore ruining the surprise.”
Completely illogical, I know. (This was in the days before “Secret” boards.) And now, of course, I cannot find the original pin or website. But I have seen this sort of thing a lot on Pinterest and I’m throwing my own project into the mix. Find this on my Holiday Ideas board.
You will need:
- Clear glass bulbs
- An acrylic floor finisher, such as Pledge Floor Care (many tutorials use Mod Podge, but I don’t think that is as viscous or flexible as Pledge Floor Care)
- Ribbon
- Monogram Decals
AND
- GLITTER! Any color you like! Cue the hallelujah chorus.

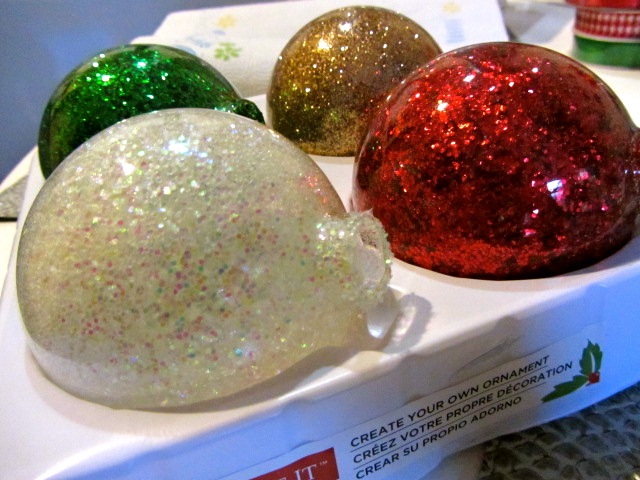
So here we have the glass bulbs. I got these from Michaels. They also had plastic bulbs, which may work fine, but they won’t look as nice. Spring for glass.

Start by removing the silver hanger/top from the ornament.
Pour some Mop N Glo into the ornament and slowly swirl it until the entire inside has been coated. You want to swirl sloooowly to avoid bubbles. Pour the excess back into the bottle.

The wonderful, great, brilliant part of this project is that the glitter is contained inside the ornament in the end result. Not glued to the outside. So your friends will thank you that you didn’t give them something that will rain glitter or get all over their hands and clothes every time they touch it. Brilliant.
Make sure you have a trusty “helper” who is willing to be quality control. 
You don’t need much floor finisher to coat the inside. (Please note the shot glasses were great for holding the ornaments upright. I was not drinking alone. Thank you.)
Next you will pour a generous amount of your glitter of choice into the ornament. Then you will slowly swirl the ornament and watch as the Pledge Floor Care grabs and holds the glitter in place. I turned the ornament sideways (like the photo above) and slowly rotated it around and around, increasing the angle so that the glitter would keep making its way toward the top (open end) of the ornament. If you need more glitter, you can pour more in. You’ll likely need to pour out any excess glitter into the glitter container.
Be very gentle during this step. Don’t shake the ornament. You want as much glitter to stick to the floor care finish and stay there until it sets!
Once you have the ornament coated to your liking, put it back in the holder to dry and set. I allowed mine to dry over night. Don’t put the silver lid back in yet.
The next day, I carefully put the silver tops back on the ornaments. Don’t twist or turn them once the wire parts are inside. This will scrape the glitter off. I then tied a cute little bow with the ribbon around the silver loop, purely for decoration. I tied a second piece of ribbon in a loop to hang the ornament from the Christmas tree. Use sharp scissors to avoid fraying the ribbon. I also dabbed a small amount of clear nail polish on all of the ends to prevent fraying.
About those monograms. I ordered mine from Etsy. I believe there are machines and kits you can purchase to make your own decals at home. That was not the best option for me, as I didn’t think I would use it enough to offset the cost. There are plenty of Etsy stores that sell decal monograms. I used three different stores and the quality was consistent across the three.
It is smart to make a list of the monograms you will need, along with the ornament/decal color combo you want for each one before you begin the project. For example, my mom has a “gold” Christmas tree, so I knew I wanted a gold ornament for her and Dad. I got them a white monogram so that it would be classy and understated (as opposed to say, red, which would stand out in a bad way on her glittery, golden tree).

I made a list of all of the monograms I would need and then checked, double checked and triple checked that the letters were in the correct order before buying anything! When the decals arrived, I applied them to the ornaments using the provided instructions. Tips on that later.
For our non-married friends, I either did the initial of their last name or a personal monogram. A monogram for an individual is the first initial of their first name, followed by the first initial of their last name in the middle and the first letter of their middle name comes last.
So Rebecca Rose Fitzgerald is “RFR”
For a married couple, a monogram is the first letter of the wife’s name, followed by the first letter of the couples last name in the middle and the first letter of the husband’s name comes last.
So Rebecca and Scott Fitzgerald’s monogram is “RFS.”

What I Learned:
- This project will be twice as fun if you make cinnamon tea and listen to Nat King Cole’s Christmas album.
- Straight fonts are MUCH easier to apply to a rounded surface (such as these ornaments) than scripty, swirly, curly fonts! There was much angst over applying the scripty font decals.
- If your monogram consists of three separate letters (meaning they don’t overlap at all), whether they are curly or not, cut out each individual letter and apply them separately. Start with the middle letter and then apply the side letters. This helped me overcome the challenge of applying the decal on the very curved surface of the ornament.
- If your monogram is all one scripty (beautiful, yet challenging) piece – start in the middle. Do not start on the left and work to the right, as that won’t allow the far side to lay right. It will be “squinched.”
- Relax if there are some blemishes! Yes, you want this to look professional. But it IS a project that was done at home – so there may be a crooked letter or an overlapping piece of decal. But there was also a ton of time, thought and effort put into this personalized gift. If you have the great friends I know you do, they will love it regardless.
- This technique can be used for vases, bottles or anything else you want to “glitterize.” And you can also use the monogram tips above to apply monograms to wine glasses, which would be a great bridal shower or bachelorette gift.
 My last piece of advice is to make these enough in advance that you can gift them early. This allows the gift-recipient to display their new favorite ornament THIS Christmas, rather than having to wait a full year. We gave them to Scott’s family at Thanksgiving and we hand-delivered them to our friends with freshly baked chocolate chip cookies in the weeks leading up to Christmas.
I hope you have enjoyed this!

What size script monograms did you order (in inches)? I would LOVE to make these for my friends for our annual cookies swap party next month!
Hi Carly! I bought 2″ tall monograms. Hope it helps and that they are a hit at your cookie swap!
-Rebecca
This is beautiful! I can’t wait to make it. I found some BIG clear ball ornaments…but they are plastic 😦 torn between big bold/ or classy not cheap 🙂
How can I do a secret pin? I don’t want people copying me and result assure, it WILL happen.
Good luck with your project! And you can create a secret board on Pinterest and then save the pin to the secret board. No one will find it!
Could you name the Etsy stores you bought the monogram decals from? The variety you have is amazing!
-Paola
Hi Paola,
I purchased from “Decal Monograms” and “Unique Vinyl Creations” on Etsy.
Hope this helps!
Rebecca
Paola, I have a vinyl cutter, I can cut them for you if you can’t find anywhere to buy any online.
What kind of cutter dk you have?
I actually don’t. I purchased the monograms from an etsy shop.
Overall how much did this cost? Where did you get your supplies? Were there smaller containers of the Pledge floor care?
Hi there,
I would say I spent around $30-$40 on everything? I got the craft supplies from Michaels and the Pledge floor care from a local hardware store. I only saw the one, large size, unfortunately. But I just made some more for my niece and nephews this weekend and it was nice to have some on hand!
Pingback: Blogmas Day #3: DIY- Monogram Ornaments | Classy Girl With Curls
This is amazing! I love it!
I have a question! Does the cleaner Actually dry on hard? I tried using baby oil and it works great but doesn’t actually dry, just keeps it in place!
Hi Carrissa,
I’m pretty sure it actually dries. I got a few drops of floor cleaner on my fingers and it starts to feel sticky rather quickly. Also, when I put the metal holders back in the bulb, nothing moved (I was pretty careful though).
Hope that helps!
Rebecca
Thank you
Where do you get/order your monogram decals?
Hi!
I purchased from “Decal Monograms” and “Unique Vinyl Creations” on Etsy.
Thanks!
Rebecca
Love this project – so creative and fun! Just wanted to let you know I featured it in my roundup of glass ornament crafts here. Feel free to check it out if you want and hope you like it! : )
-Mel the Crafty Scientist
Do you coat the ornament with the floor finish then pour the excess out or leave it all in there? Thanks!
Hi Morgan,
I pour out the excess. Thanks!
Do we have to cut each letter out individually or do the 3 letters come connected?
It depends. The swirly, scripty monograms were all connected. The monograms that were straight came as three separate letters. Those were far easier to attach than the swirly monograms. Hope it helps!
Does it matter if the Pledge floor care is for wood floors? That is all I could find at our store so just wondering. Thanks!!!
Hi! I would absolutely give it a shot. I don’t see why it wouldn’t work. I would recommend trying one ornament first and waiting to see if the glitter sticks as it dries before doing all of them. Good luck!
Just a tip, I cut the metal prongs short so they don’t scrape the glitter and then I glue to entire silver cap on with hot glue.
Brilliant!
What sizes did u buy for the decals I know u said 2″ but you have different sizes what sizes are the outer 2 letter and what’s the size of the middle letter?? Thank u
Hi Rosanna, for the 3 letter monograms, they came as a set from the vendor, so I didn’t have to specify the sizes of the individual letters. I would just look for a vendor selling monogram decals and pick the size closest to 2″. Hope it helps!
At our Hobby Lobby, there are two sizes of ornaments, one regular and one Large. Are these the Larger ones??? just wanted to get the Larger ones and hoped the 2″ letters was big enough?
I’d have to know the exact size of the ornaments to be sure, however, I do believe that the larger size is a safer bet to ensure the 2″ decals fit. Good luck!
Love this idea. Making these for all of my nieces for Christmas. THANK YOU!
Thank you! I’m sure your nieces will love, mine did 🙂
Mine were beautiful at first. But later (a few weeks) the glitter didn’t stick! So sad. Wondering if I can just “redo” them? Any ideas?
I’m sorry that happened! I just put mine up yesterday and they were holding strong (3years later). I think if you put more of the liquid inside it might wash out the glitter? But that would be good so you could start over. Good luck and I’d love to hear what you end up doing!